Setting up OWASP ZAP in Azure DevOps Release Pipeline for API & UI
Introduction: In today’s interconnected world, ensuring the security of applications is paramount to safeguard against potential threats. A powerful tool for conducting security tests is the OWASP Zed Attack Proxy (ZAP). In this guide, we will walk you through the process of configuring OWASP ZAP within an Azure DevOps release pipeline, enabling you to conduct comprehensive security testing for both API and UI components of your applications.
 Pipeline
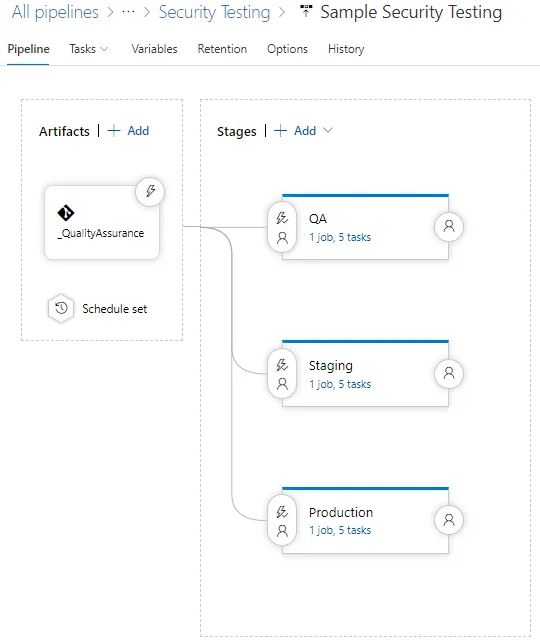
1. Agent/Repository Configuration: To initiate the process, you need to set up a repository and include the file named “OWASPToNUnit3.XSLT”. This specific file serves as the bridge between the OWASP ZAP security report and the NUnit3 report, which can be readily interpreted by the pipeline. Arrange the artifacts within the repository to facilitate the pipeline’s execution.
Select an Ubuntu build agent for the pipeline, especially if you are employing Linux Zap Docker images for testing. In situations involving extended test cases, it is advisable to opt for self-hosted agents or Azure container implementations. For further insights, refer to relevant resources.
 Release pipeline jobs
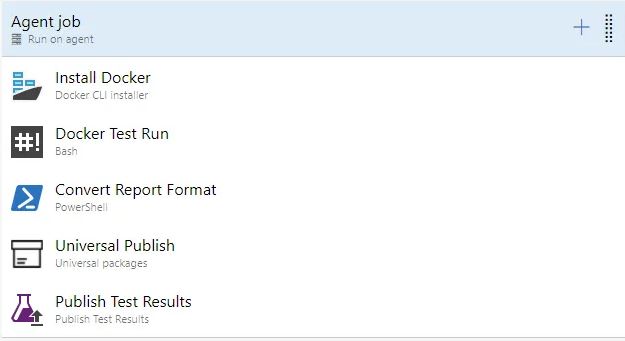
2. Install Docker: Initiate the process by creating a DockerInstaller task within your pipeline. Specify the Docker Version as 17.09.0-ce and choose the Release type as stable.
3. Docker Test Run: Now, establish a bash task that will execute the security tests. Configure the working directory to $(System.DefaultWorkingDirectory), the default cloned directory for artifacts where the ZAP report will be generated. Include the following commands within the bash script:
1
2
3
chmod -R 777 ./
docker run --rm -v $(pwd):/zap/wrk/:rw -t owasp/zap2docker-stable zap-full-scan.py -t https://example.com -g gen.conf -x OWASP-ZAP-Report.xml -r scan-report.html
true
The initial command modifies folder permissions to accommodate the report generated within the Docker container. The subsequent command executes the ZAP scan with the necessary parameters. Replace “https://example.com” with your site’s URL or convert it into parameters as needed. Note that the final “true” statement ensures the bash script’s successful execution.
4. Report Converting: Create a PowerShell task to transform the XML OWASP ZAP report into the NUnit3 report format. Include the following commands:
1
2
3
4
5
6
$XslPath = "$($Env:SYSTEM_DEFAULTWORKINGDIRECTORY)/_QualityAssurance/SecurityTest/OWASPToNUnit3.xslt"
$XmlInputPath = "$($Env:SYSTEM_DEFAULTWORKINGDIRECTORY)/OWASP-ZAP-Report.xml"
$XmlOutputPath = "$($Env:SYSTEM_DEFAULTWORKINGDIRECTORY)/Converted-OWASP-ZAP-Report.xml"
$XslTransform = New-Object System.Xml.Xsl.XslCompiledTransform
$XslTransform.Load($XslPath)
$XslTransform.Transform($XmlInputPath, $XmlOutputPath)
The provided XSLT file facilitates the conversion of XML data into the NUnit3 report format. You can customize the XSLT file to modify the report according to your needs. The resulting file will be named “Converted-OWASP-ZAP-Report.xml.”
5. Publish HTML Report: Utilize the UniversalPackages task to publish the HTML report to a designated feed. Specify the command version as 0 and select “publish” as the command. Set the “Path to file(s) to publish” as $(System.DefaultWorkingDirectory) to include all pertinent files. Choose the desired destination feed from the dropdown menu and assign a package name. It’s important to note that publishing the HTML report is optional.
6. Publish NUnit Result: Create a PublishTestResults task with the task version set to 2. Select NUnit as the test result format. Set the search folder to $(System.DefaultWorkingDirectory) where the generated report resides. Set the “Test results files” to “Converted-OWASP-ZAP-Report.xml,” the transformed test result file.
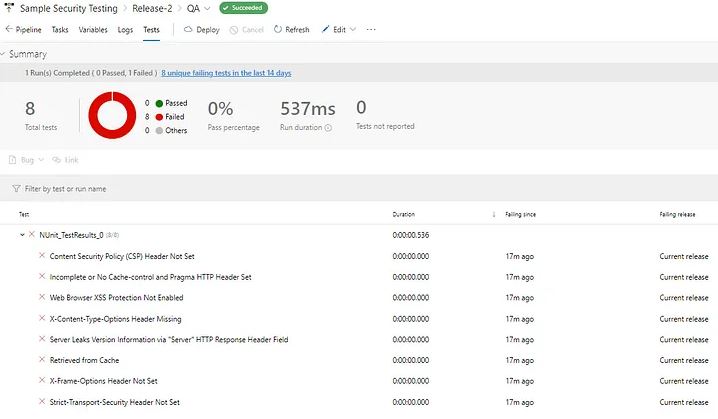 Test output
Bonus: For API testing, substitute the existing Bash script with the following commands:
1
2
3
chmod -R 777 ./
docker run --rm -v $(pwd):/zap/wrk/:rw -t owasp/zap2docker-weekly zap-api-scan.py -t https://example.com/swagger/v1/swagger.json -f openapi -g api-scan.conf -x OWASP-ZAP-Report.xml -r api-scan-report.html
true
To ensure continuous security, implement a scheduled release trigger to execute the tests at regular intervals and keep the test results updated.
Conclusion: Configuring OWASP ZAP within an Azure DevOps release pipeline is an effective way to enhance the security of your applications. By following the outlined steps, you can seamlessly integrate security testing into your development process, mitigating potential threats and ensuring the robustness of your software products.
Resources: